How To Prepare Your Floor For A New Polyaspartic Concrete Coating
Hello, we’re Floortek Coatings, and we'd like to discuss your flooring needs with you. You’re here because you’re smart. You know that a great floor isn’t just about the shiny top coat; it’s about the work that happens underneath. You've asked, "How To Prepare Your Floor For A New Polyaspartic Concrete Coating?" and we’re here to give you the professional answer.
Let's be honest. You’ve probably seen the peeling, yellowing, and bubbling of a failed garage floor. That’s almost always a cheap epoxy kit or, even worse, a professional job with inadequate preparation.
At Floortek, we don't use epoxy. We use a polyaspartic and polyurea coating system that is 10X better than epoxy. It’s more durable, more flexible, and won't turn yellow from the sun. Best of all, we can do it in just one day.
This guide will show you how to perform professional preparation—the only way to achieve a floor that lasts. This process is the secret to our 1-day floor coatings.
As a thank you for learning with us, we’re offering a 30% discount on your first-time installation! Please continue reading to learn how we do it, and then request your Free Quote.
Why You Can Trust Floortek's Preparation Process
When you search for garage coating companies near you, you'll find a lot of options. Many are "one-size-fits-all" installers or handymen using low-grade materials.
We are different.
We are specialists. This is all we do. The team at Floortek comprises a group of trained and certified installers who have a deep understanding of concrete. You can read our story on our About Us page and see the proof in our Gallery. We’re so confident in our preparation method that we back our work with a Life-of-home warranty, giving you peace of mind that your floor is in expert hands.
We don't sell DIY kits because we know that preparing your floor for a new polyaspartic concrete coating is a professional job. It requires heavy, specialized machinery that cannot be rented at a local hardware store. Our professional garage floor coating process is built on a foundation of experience, and we want to share it with you.
What Is a Polyaspartic Coating (And Why Is It 10x Better Than Epoxy?)
Before we get to the "how," let's talk about the "what." You need to know why this advanced material is worth the professional prep.
So, what is a polyaspartic concrete coating? In simple terms, it's a newer, more advanced type of concrete coating. It was first used on bridges and industrial sites because it’s incredibly tough and cures very, very fast. We've perfected this technology for your home.
Here’s the simple breakdown of polyaspartic vs epoxy garage floor:
Epoxy Peels and Fails. You’ve seen it. A car parks on a hot day, and the tires cool down. When the car backs out, the epoxy coating peels right off with it. This is called "hot-tire pickup." It happens because epoxy creates a weak bond. This is one of the most significant discoveries of the drawbacks of epoxy garage floors.
Epoxy Turns Yellow. Epoxy is not UV stable. This means that if your garage door is open or you use it for a patio coating service, the sunlight will break it down and turn it a sickly yellow color over time.
Epoxy Takes Days to Install. Epoxy has a very long cure time. A typical install takes 3 to 5 days. Who has time for that?
Our polyaspartic system addresses all of these issues. It’s 10X better than epoxy.
Our coating bonds with the concrete, becoming a permanent part of it. It won't peel.
Our system is 100% UV stable. It will never yellow or fade, even in direct sunlight.
Our system cures fast, allowing us to complete the entire job in just one day. Imagine waking up to a brand new garage floor, ready for use, the very next day.
When people ask us if polyaspartic is better than epoxy, the answer is a clear "yes." It's not even a fair fight. The polyaspartic garage floor coating vs epoxy debate is over. The real question is, what is the best garage floor coating? It's the one that's installed right, and that starts with prep.
The Biggest Myth: "Polyaspartic Prep vs. Epoxy Prep"
Here is the biggest mistake homeowners make: they think the preparation for all coatings is the same.
The instructions on a cheap garage resurfacing epoxy kit will tell you to "acid etch" the floor. This involves pouring acid and water on the concrete to clean and roughen it.
This is a terrible idea.
Acid etching is messy, dangerous, and, worst of all, it doesn't work. It provides a weak surface profile that is prone to failure. The acid can also soak into the concrete and cause problems later. With our mechanical bond process, you can rest assured that your floor is being prepared safely and effectively.
A high-performance polyaspartic floor coating needs a mechanical bond. It requires a surface that is clean, open, and has a texture similar to 80-grit sandpaper. The only way to achieve this is with diamond grinding. This is one of the most crucial floor resurfacing techniques and is the first step in preparing your floor for a new polyaspartic concrete coating.
How To Prepare Your Floor For A New Polyaspartic Concrete Coating: The Floortek Pro-Grade Process
Alright, let's get into the details. This is our 8-step professional process. This is how to prepare your floor for a new polyaspartic concrete coating the right way. This is the best way to improve your garage floor.
Step 1: The Full Inspection (And Why Climate Matters)
The job doesn't start with a grinder. It begins with an inspection. We walk your entire floor and identify any issues that may arise.
The most important thing we test for is moisture. Concrete is like a hard sponge; it can pull moisture from the ground. In humid regions of the United States or areas with a high water table, this can be a significant issue. If you trap that moisture under a coating, it will push the coating right off, causing bubbles and peeling.
We use professional-grade moisture meters to test your slab. According to the Environmental Protection Agency (EPA), controlling moisture is one of the most essential parts of maintaining a building.
If we find high moisture, we have a solution. We can apply a special moisture-blocking primer (a vapor barrier) that stops this moisture, allowing us to install the garage coating successfully. This is a step most companies skip, and it's why their floors fail.
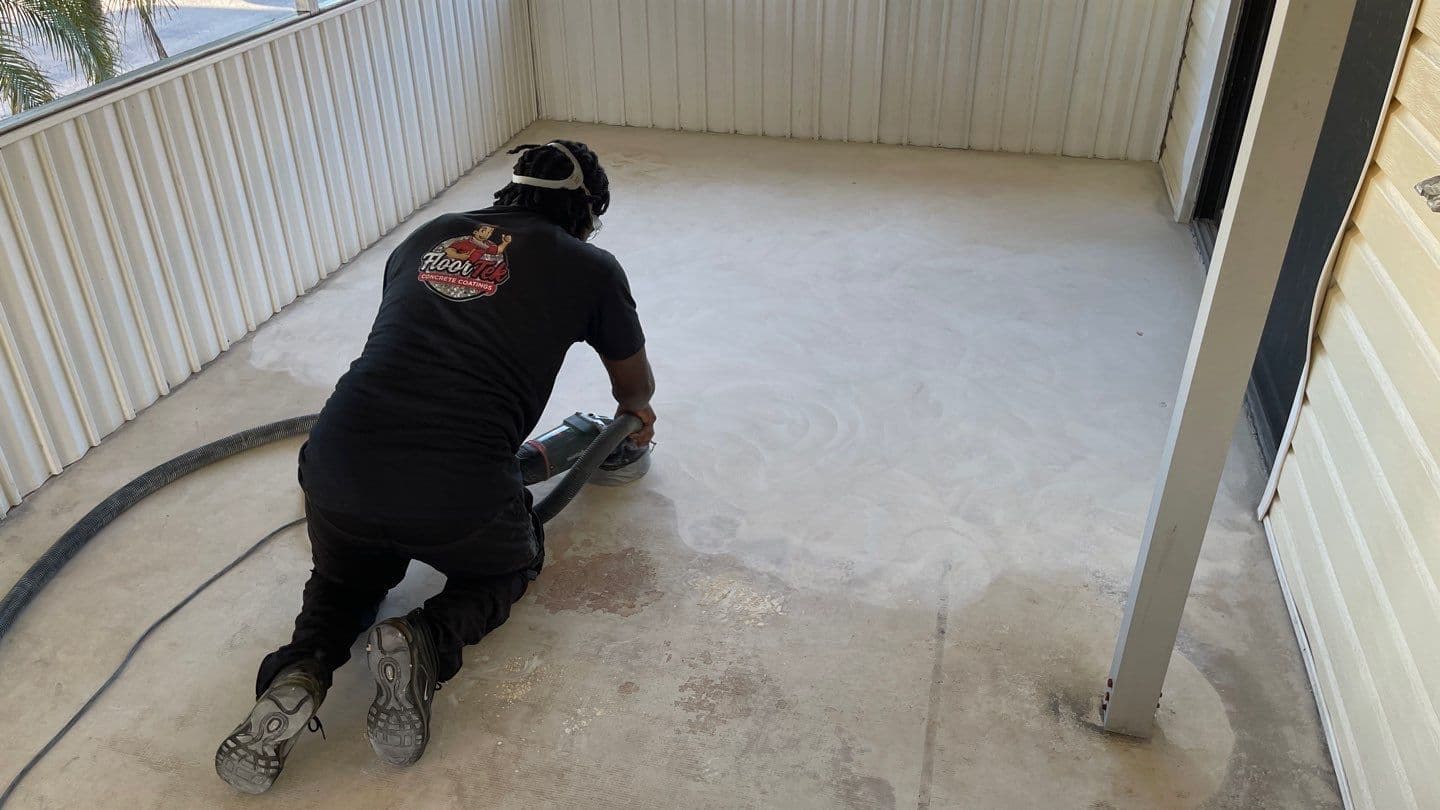
Step 2: The Grind (The Most Important Step)
This is the most critical step in preparing your floor for a new polyaspartic concrete coating.
We don't use acid. We use massive, 800-pound diamond grinders. These machines have rotating discs armed with industrial diamonds that physically remove the top layer of your concrete.
This does three things:
It removes all old, failed coatings (such as old epoxy) and any sealers, dirt, or oil.
It opens up the "pores" of your concrete so our base coat can soak in deep.
It creates the perfect anchor profile for our coating to adhere to permanently.
We hook these grinders to powerful HEPA-filter vacuums. This means our process is virtually dust-free. We also use smaller, hand-held grinders to get every single edge and corner, ensuring 100% of your floor is perfectly prepped.
Step 3: Repairing Cracks and Pits
Your floor isn't perfect. It has cracks, pits from road salt, or spalling (where the concrete has flaked away).
Other installers and epoxy kits will paint over these or fill them with a weak concrete patch. What happens? The crack comes right back.
We do it differently. We use a special "crack chaser" blade to open up every crack and pit, cleaning out any loose debris. Then, we fill these cracks with our flexible, fast-curing polyurea repair material. This material is designed to move with your concrete as it expands and contracts with the seasons, from hot summers to freezing winters.
This means the crack is repaired permanently. This is a crucial step in resurfacing a garage floor, not just painting it.
Step 4: The HEPA-Vac Cleanup
Now that the floor is ground and repaired, we do a final, detailed cleanup. We meticulously vacuum every inch of the floor, including the walls and ledges.
Any dust left behind is a "bond breaker." It prevents the coating from sticking. We are committed to ensuring your floor is perfectly clean before we mix a single drop of product. This attention to detail is what defines how to prepare your floor for a new polyaspartic concrete coating.
Step 5: Applying the Polyurea Base Coat
Now the fun begins. We mix our 100% solids, pure polyurea base coat. What is a polyurea concrete coating? It's the "muscle" of our system. It's even more flexible and durable than polyaspartic, which is why we use it as the primer and base coat.
We pour this base coat onto your floor and squeegee it evenly. It soaks deeply into the newly created concrete profile, wicking into the pores and adhering tightly. This creates a bond that is literally stronger than the concrete itself. If you tried to pull it up, you would break the concrete, not our bond. This is a polyurea coating for a garage floor at its best.
Step 6: The Full Flake Broadcast
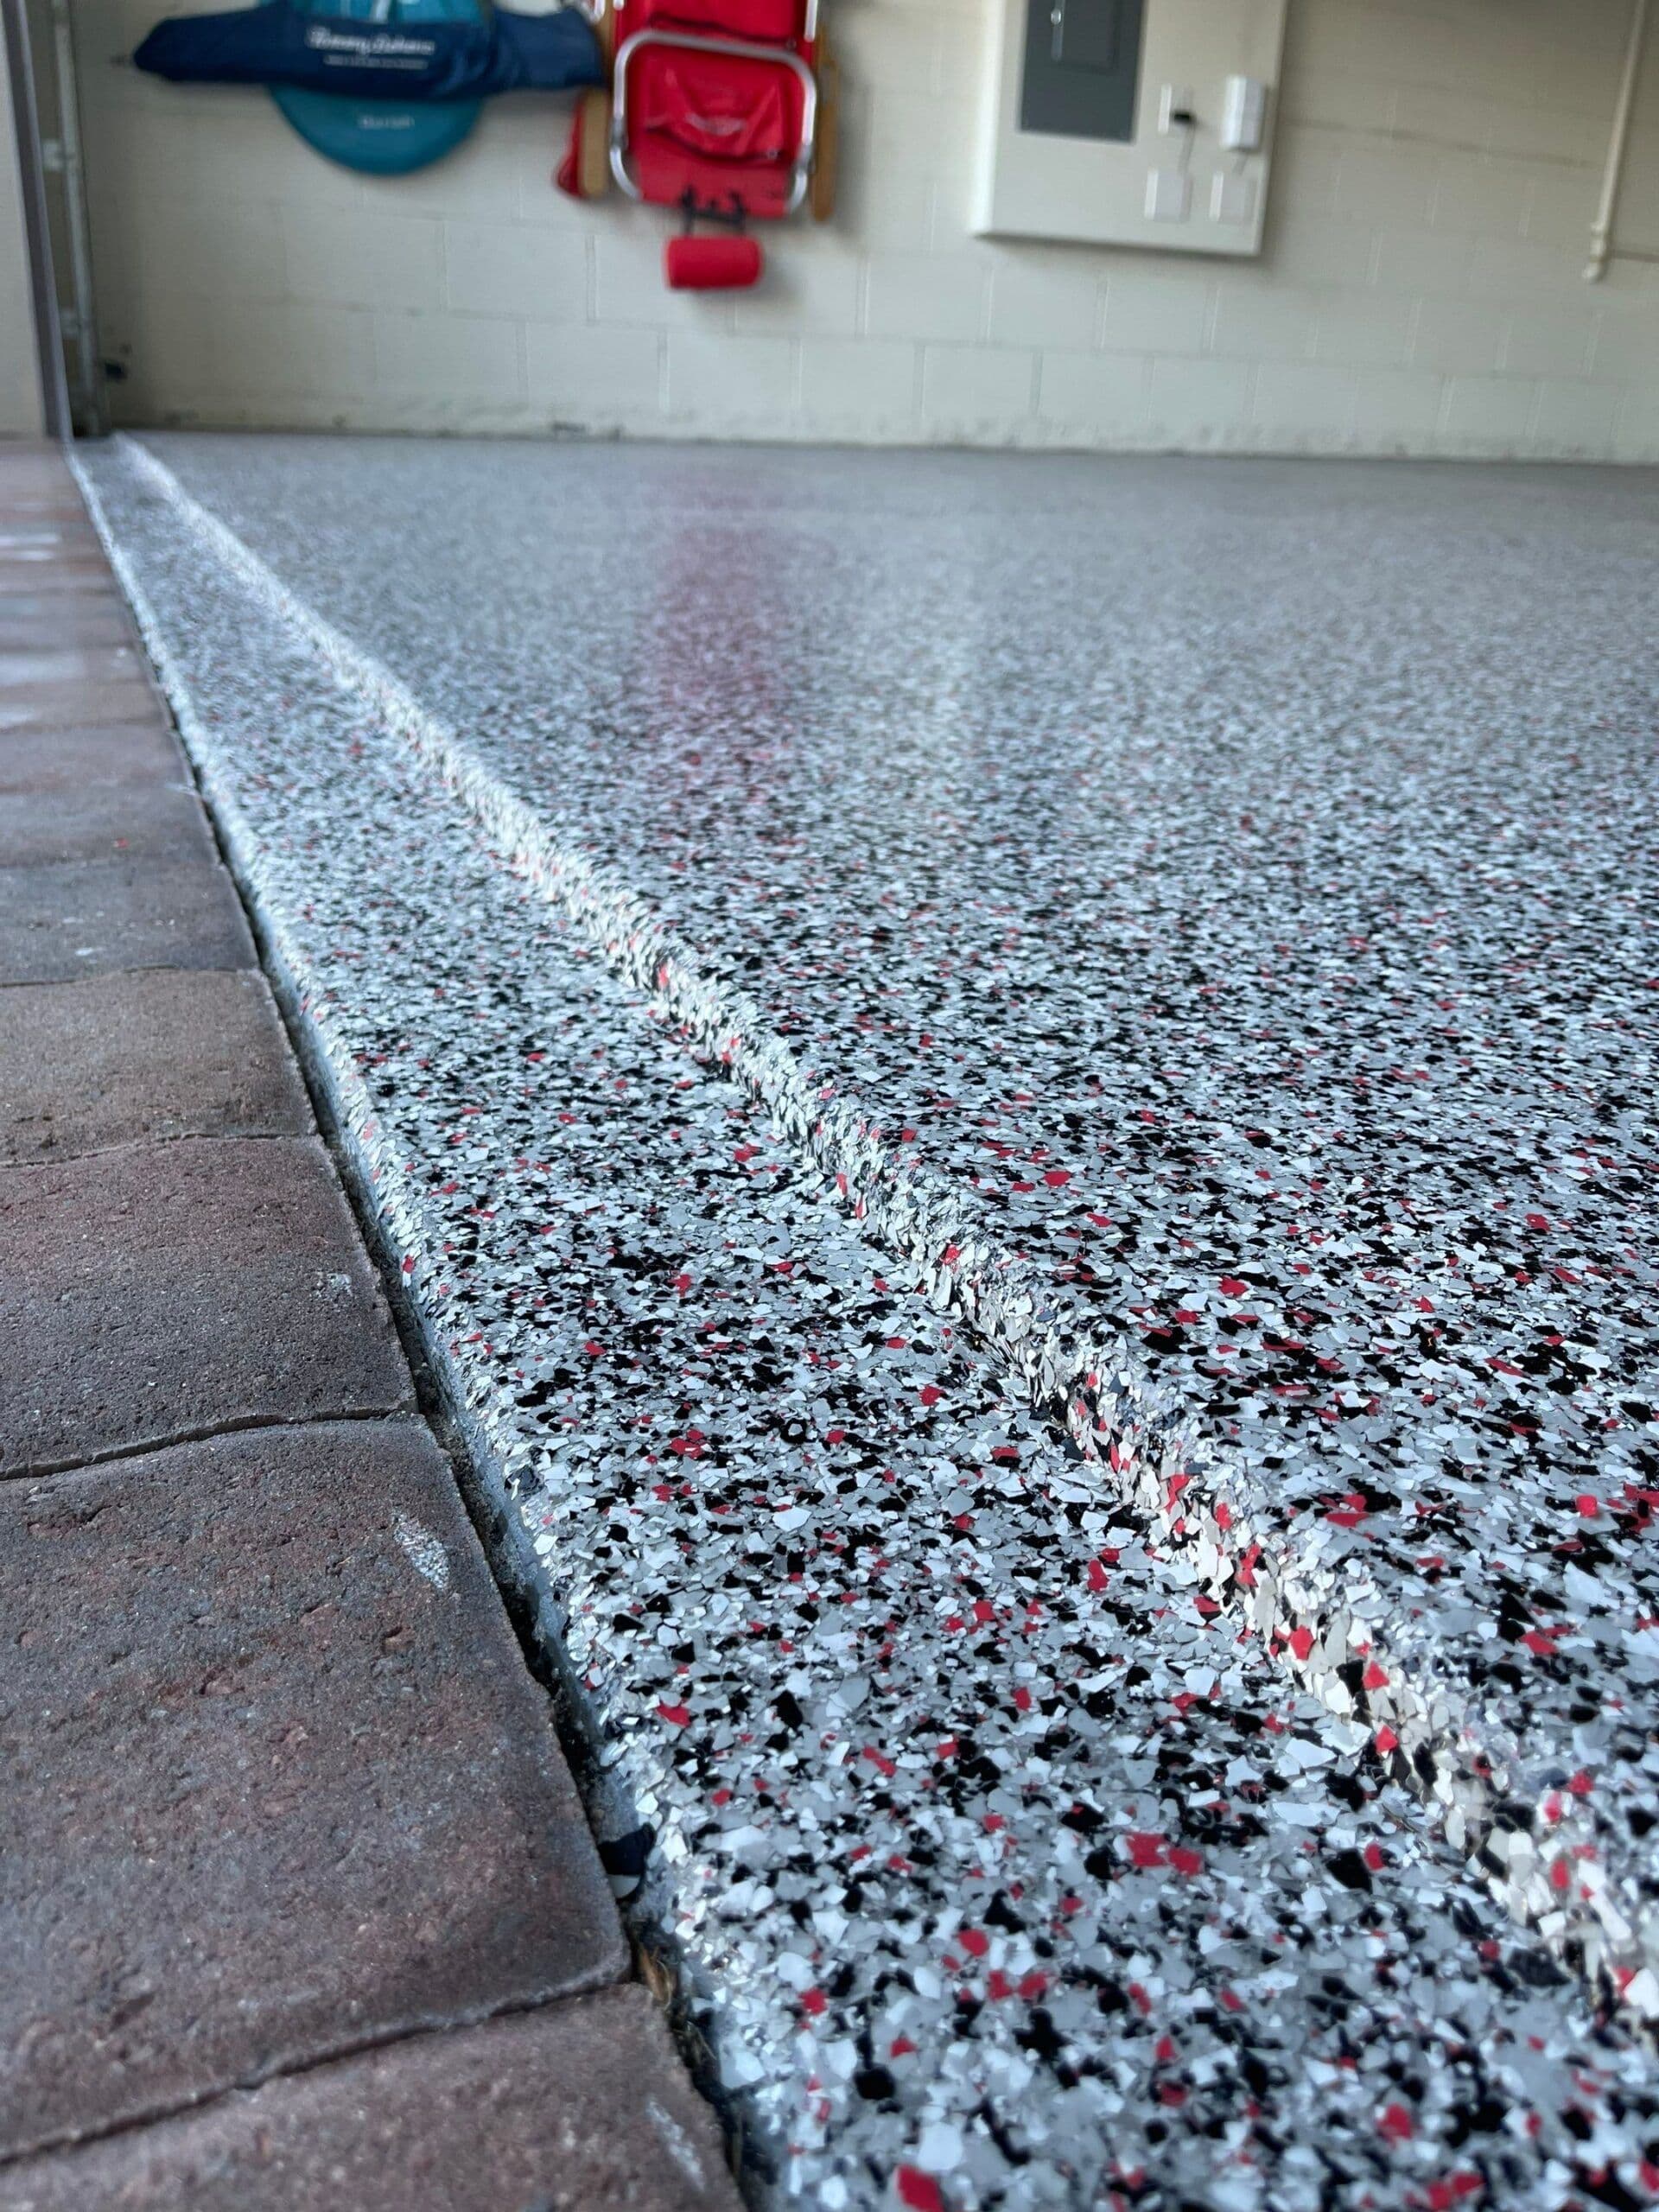
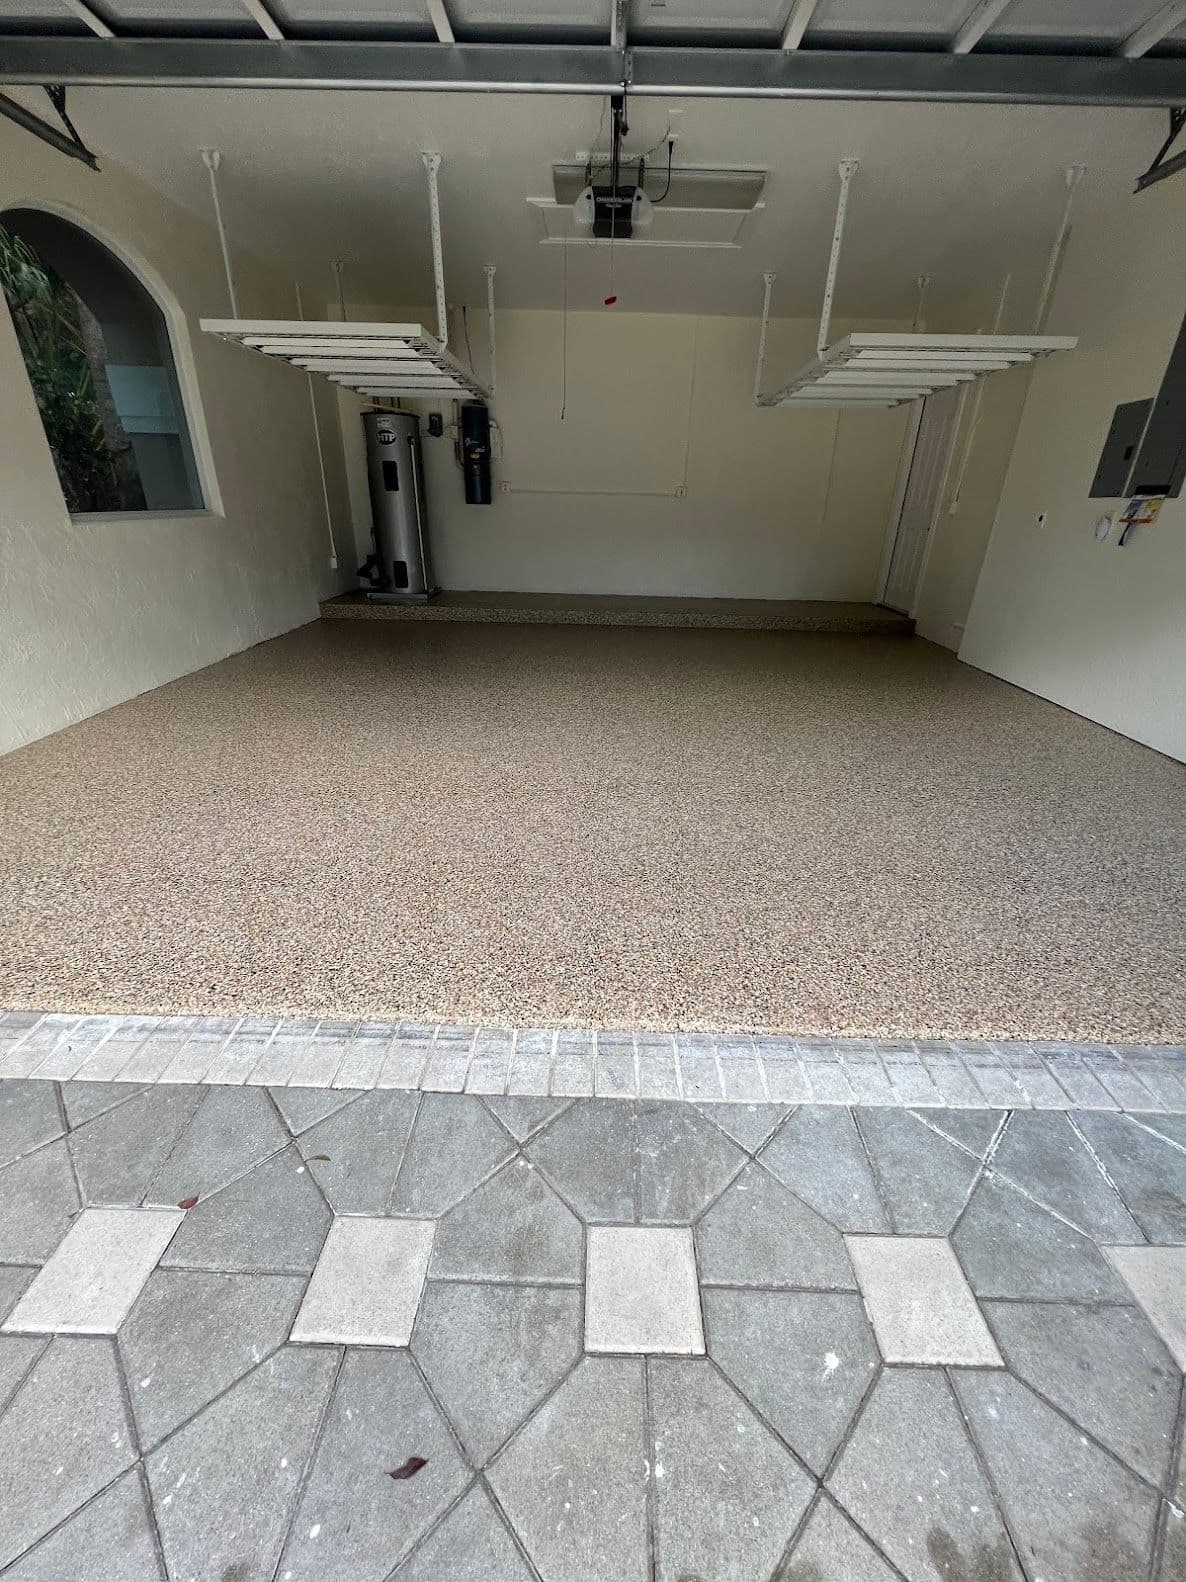
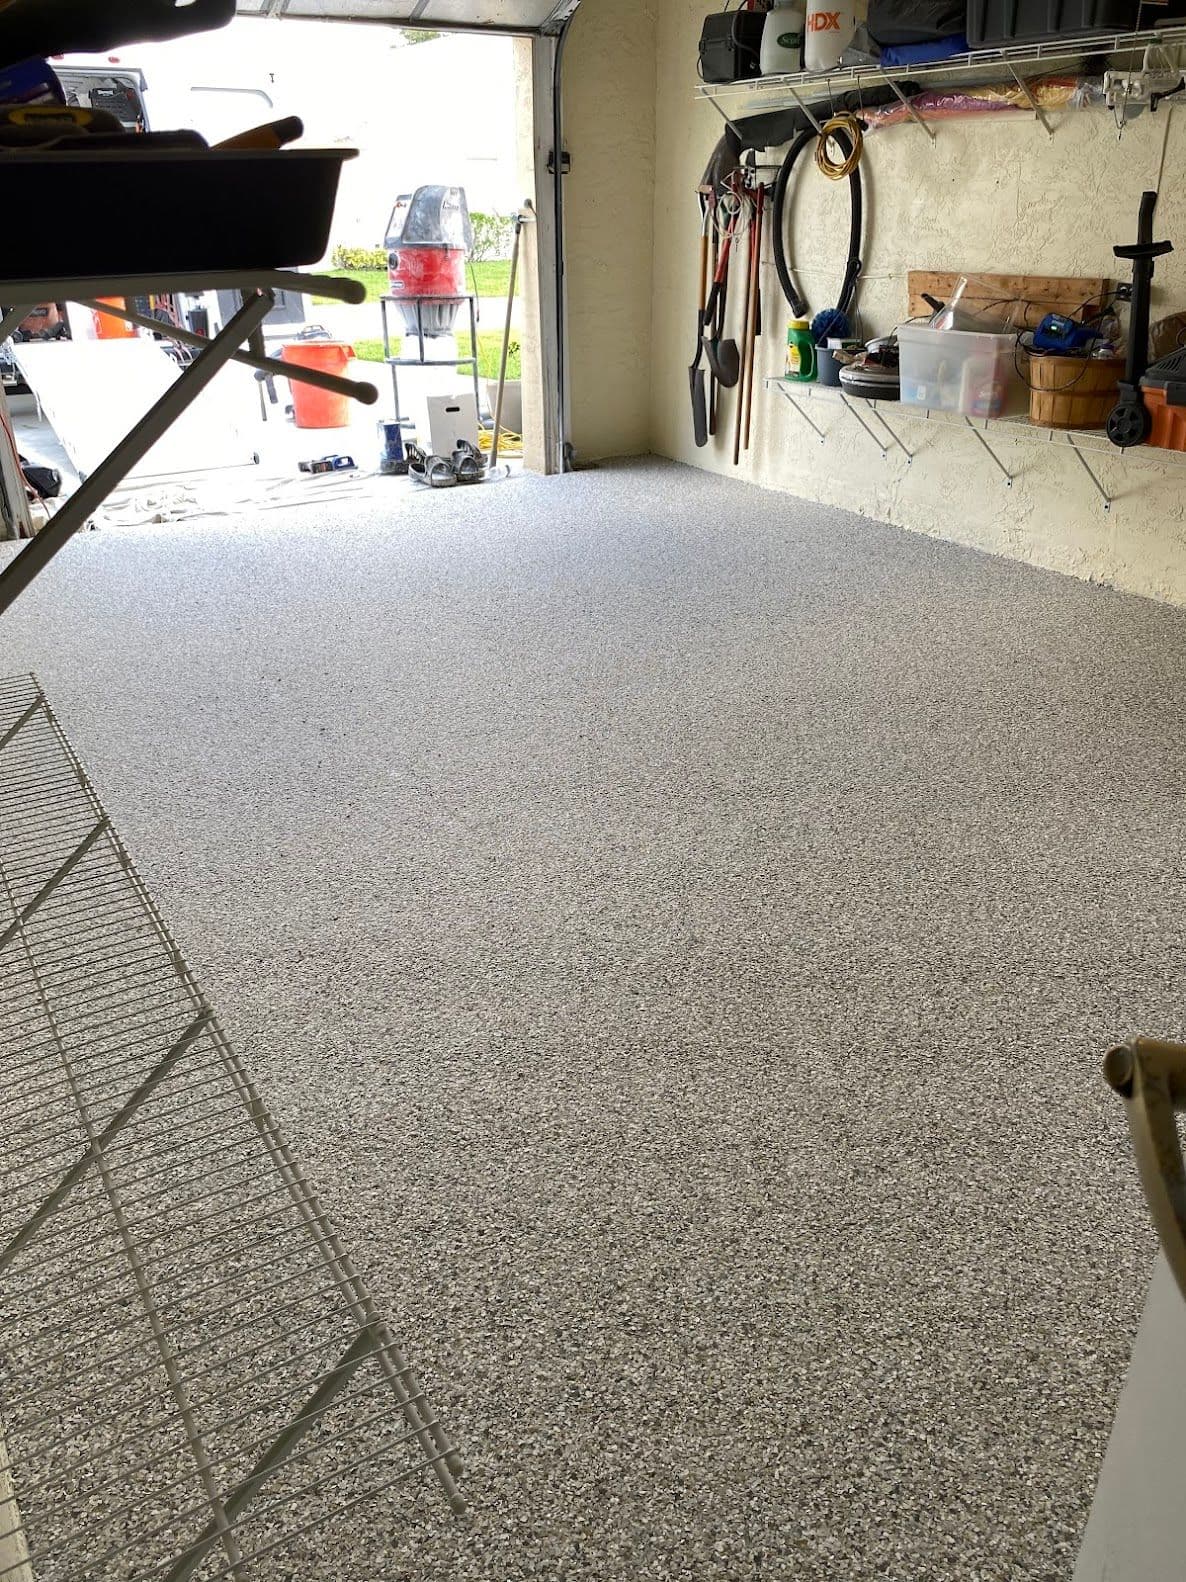
While that base coat is still wet, we broadcast a massive amount of decorative vinyl flakes. We don't just "sprinkle" them lightly like some companies. We broadcast them until the floor is 100% covered, or "to rejection."
This does two things. First, it gives your floor its beautiful, granite-like look. You can see all our Colors and Flake Options on our site. Second, it creates the textured, "orange peel" feel of the floor, making it easy to walk on.
Step 7: Scrape and Vac (Again)
After about an hour, the polyurea base coat is cured. We then walk on the floor with metal scrapers and scrape the entire surface, knocking down any loose or standing-up flakes. This creates a smooth, uniform texture.
Once it's scraped, we perform another full HEPA vacuum to remove all the excess flakes. The floor is now ready for its final layer of protection.
Step 8: The Clear Polyaspartic Top Coat
This is the final step. We roll on our 100% solids, UV-stable polyaspartic floor coating. This evident coat seals in the flakes and provides the main protection against chemicals, abrasion, and sunlight.
This is the "magic" layer that makes our polyaspartic garage floor coatings so famous. It cures fast, has a beautiful high-gloss finish, and is incredibly easy to clean.
After a few hours, you can walk on it. Within 24 hours, you can park your car on it.
That’s it. In just one day, we have transformed your old, ugly concrete into a beautiful, durable polyaspartic garage floor that is 10 times better than epoxy. That is how to prepare your floor for a new polyaspartic concrete coating and complete the job.
Where Can You Use a Polyaspartic Coating?
While we often discuss the polyaspartic garage floor coating, this system is suitable for almost any concrete surface. Our prep process is the same.
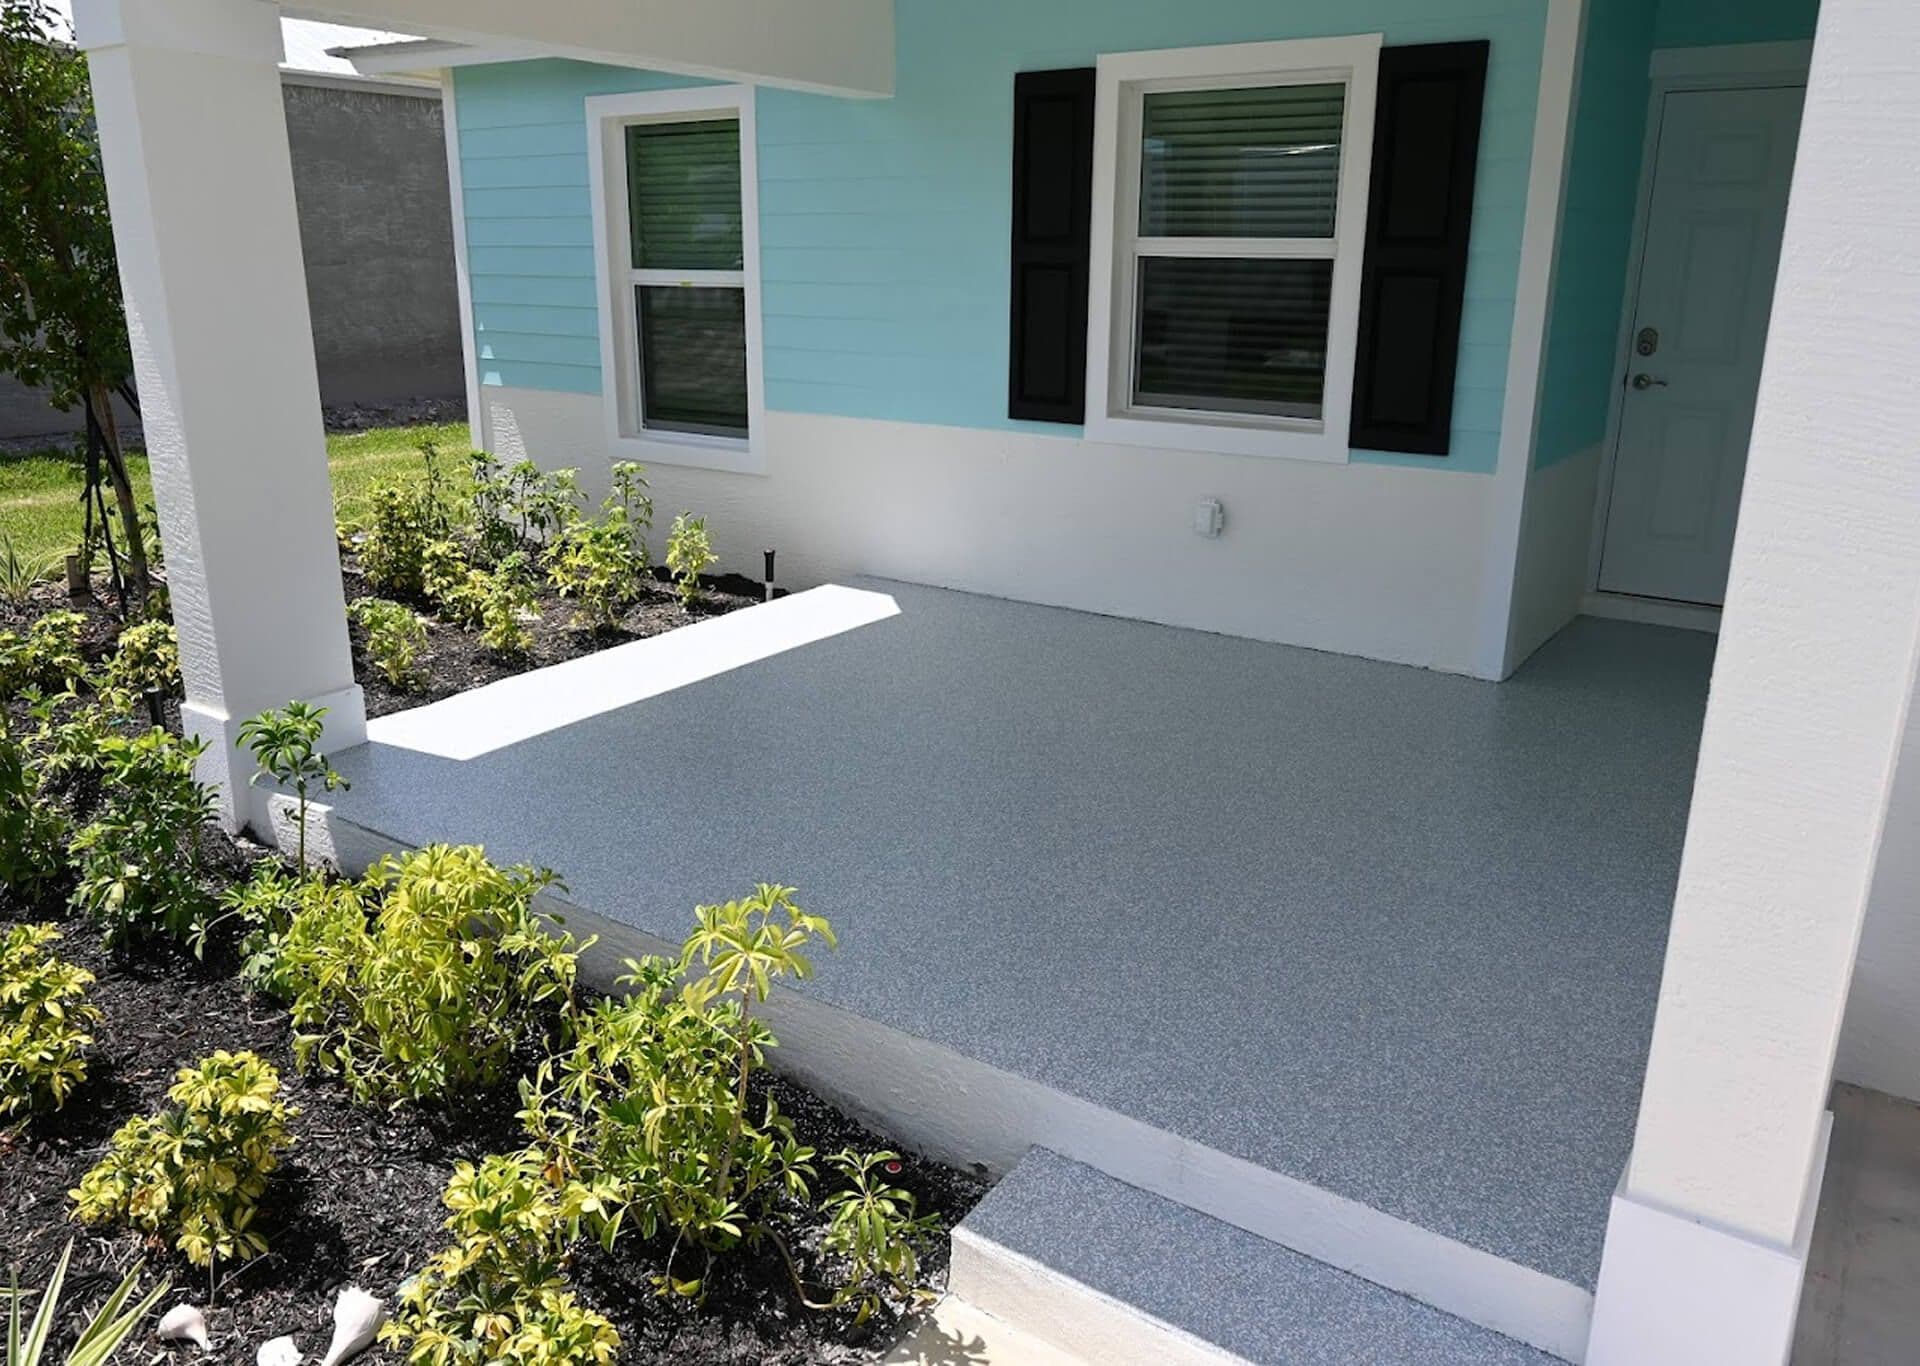
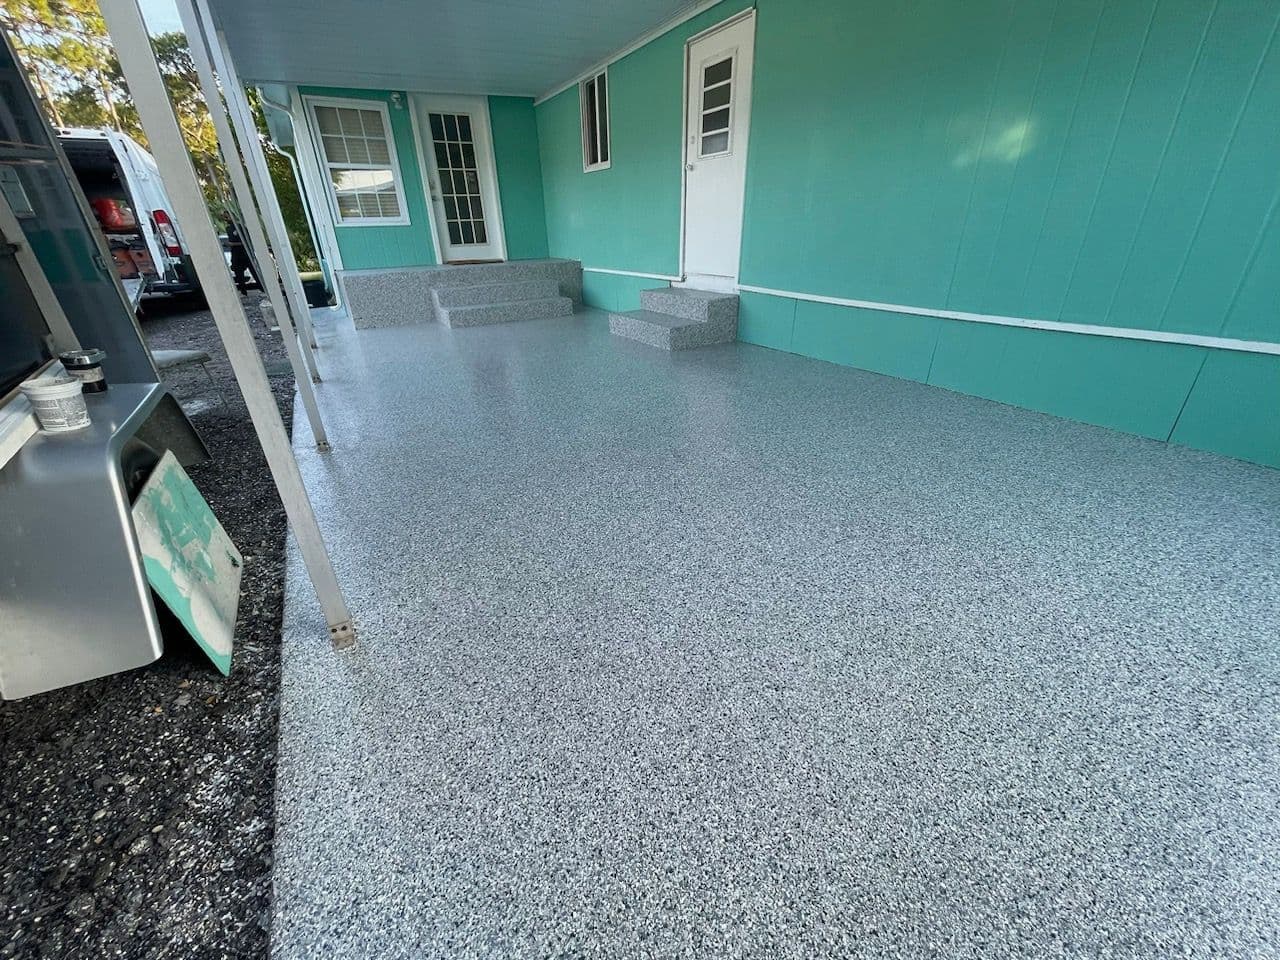
Patio Coating Service: Our system is 100% UV-stable, making it ideal for outdoor patios. It won't fade or yellow in the sun.
Pool Deck Coating Service: The flake system provides the surface with a great texture that is comfortable to walk on.
Driveways Coating Service: It's tough enough to handle cars, road salt, and snowplows.
Sidewalk Coating Service: Boost your home's curb appeal with a clean, finished look.
Basement Coating Service: This is a great, easy-to-clean option for basements. Our moisture test (Step 1) is absolutely critical here.
Laundry Rooms: Spilled detergent? No problem. Just wipe it clean.
You can see all our different Colors and Flake Options to match any style, inside or out. Our Coating Products are designed for versatility and durability.
When you start to wonder how long epoxy lasts, you'll find the answer is "not long enough." That's why investigating the life expectancy of polyurea vs. epoxy coatings is so essential. When you want the best garage floor coating, you want a professionally prepped polyaspartic system. You can learn more about Our Coating Products right here.
Your Questions Answered: FAQs About Polyaspartic Floor Prep
We get a lot of questions. Here are the most common ones, answered for you.
1. What is the most important step for preparing my floor for a polyaspartic coating?
The most crucial step is diamond grinding. This mechanical preparation is the only way to create a strong, permanent bond. Cleaning or acid etching alone is insufficient and will lead to failure.
2. Can I prepare the floor for a polyaspartic coating myself?
We don't recommend it. Professional preparation requires industrial-grade diamond grinders and HEPA vacuums. These are not the same tools that can be rented. Improper prep is the #1 reason coatings fail, and it's costly to fix.
3. How is the preparation for polyaspartic different from epoxy prep?
Most DIY epoxy kits suggest acid etching. We never do this. Our process for preparing your floor for a new polyaspartic concrete coating requires a deep mechanical grind to open the concrete pores, creating a bond that is 10 times better than epoxy.
4. What happens if you don't prepare the concrete floor?
The coating will fail 100% of the time. It will peel up, often within a few months, especially under hot tires. It will look terrible, and you will have wasted your money.
5. How long does the floor preparation take?
The preparation (grinding, repairs, and cleaning) is the longest part of the job! For a standard garage, our professional crew typically takes several hours to complete the work. But, because our products cure so fast, we can still complete the entire installation in just one day.
6. Do you need to repair cracks before applying a polyaspartic coating?
Yes, always. If you paint over a crack, the crack will move and show through the new coating. We chase and fill every crack with a flexible polyurea material to ensure a smooth, permanent repair.
7. My floor has an old epoxy coating. What does the preparation involve?
No problem. Our diamond grinders will easily remove the old, failing epoxy coating. We will grind it all off, which also preps the concrete underneath at the same time.
8. How do you prepare a new concrete floor for a polyaspartic coating?
New concrete is not ready to be coated. It needs to cure for at least 30 days. It also has a smooth, sealed surface from the troweling process. We must diamond grind this top layer off to open the pores for our base coat.
9. What if my floor has moisture problems?
We test for this. If we find high moisture, we apply a special moisture-blocking primer (vapor barrier) after grinding. This is an additional step that ensures your polyaspartic garage floor won't bubble or peel due to moisture.
10. Why is your preparation process better for a polyaspartic coating?
Because it's a system, our Coating Products are designed to work with our preparation. The deep grind allows our polyurea base coat to penetrate and create a permanent bond, resulting in a floor that lasts.
Your Next Step: Get a Floor That Lasts
You now know the professional answer to How To Prepare Your Floor For A New Polyaspartic Concrete Coating. The secret is simple: there are no shortcuts.
It takes professional machinery, expert training, and a religious focus on cleaning and repairing the concrete foundation.
Don't settle for a cheap epoxy kit that will peel in a year. Avoid hiring a company that uses acid to clean your floor. You deserve a garage coating that looks beautiful and lasts.
We are Floortek, and we are ready to give you the floor of your dreams in just one day.
Please take advantage of our 30% OFF PROMOTION for first-time installations. It all starts with a simple, free, no-obligation conversation.
Contact us today, or call us right now at 844-844-4164 to schedule your Free Quote.
FREE In-Home Estimate
Plus 30% Off
Testimonials
We had both of our garages done and an outdoor concrete platform. The crew was courteous and professional. Everyone from Nancy our salesperson to Patrick, the manager, Logan and his crew were outstanding. Our floors look fantastic and we were very happy we chose this company.
I am very pleased with the quality of work FloorTek has done for me. The two employees that did the actual work were very courteous, worked hard, and explained everything they were doing. Thank you for a great job.
I was happy with the job Floortek did. Good customer communication and customer relationship. My old ugly porch was transformed and I love it. Nancy was very helpful throughout the process. Just know that rain may impact your schedule to make sure the products at highest quality during application.

Contact FloorTek Today